Blog

Step By Step Illustrated Guide: Building A Backyard Office
Whether you have dreamt about building an office shed in your backyard for years or just weeks, the thought of DIYing it and going it alone might have been enough to put you off starting the project. However many (if not all) of the steps are things that you can do yourself, as this handy step by step guide demonstrates!
When you buy through links on our site, we may earn an affiliate commission. As an Amazon Associate I earn from qualifying purchases.
1. The Boring Stuff: Planning And Building Permits
Planning
Before going to Home Depot and purchasing a bunch of materials, it is worth taking a step back and thinking through things a bit. Firstly, make sure that you have an idea of how much your backyard office build will cost. It would be frustrating to get halfway through your build, only to run out of money and have to stop work. As our cost guide shows, you can expect to pay anything from $1,700 to $5,490 if you do the work yourself and depending on the size and quality you go for.
Secondly, think carefully about how exactly you intend on using your office shed. Some questions you will want to ask yourself are:
- Will this purely be an office space, or might I want to use part of it for other purposes (such as a workshop or storage area) in the future? Check out our post about backyard office-shed combos, a great and practical combination.
- Will a toilet be needed? This is more convenient than having to go back into your house, but you will need to research composting toilets and the necessary pipeworks/ventilation needed for this. Check out our post about toilet options here.
- Is running water a must? If so, you will need to look at running water pipes underground from your house into your backyard office. The alternative is to purchase a large, refillable water container and take this into your office each day (filing it up from your house). If you only need to make the odd coffee and glass of water throughout the day, a water container would be a lot less work than underground pipework.
- Will it all be one big room, or will you need room partitions?
- Where will you want power outlets and lights to go? This depends a lot on where you plan to put your desk, television and any other electrical items you want.
In short, get some paper and jot down some ideas on how you plan on using your backyard office. This will give you a much better idea of the layout of the building, and any considerations (like leaving space for cabling in certain places) you need to make when framing out your office. Or check out our post about the best plans for backyard offices for more inspiration.
Finally, the direction that your office shed will face is quite important, as is its position:
- Direction (or ‘aspect’): we know that south-facing garden lawns and plants is quite important for their growth (compared to north-facing areas which will get very little sunlight). But the same is not always true of an office: depending on where you put your windows, you might have sun in your eyes for the majority of the working day. Or you might have loads of glare on your computer monitor. Both of these are bad for your eyesight and will also decrease your productivity. Read more about this on our dedicated article covering backyard office sun direction.
- Position: if you live in quite a cold area, then you probably do not want to position your backyard office where there is a lot of shade. Conversely, if you live in a warm area then shade might be your friend!
Both of these are key to think about, so once you think you know where you will position your building, go and stand in that area once in the morning and once in the afternoon to get a feel of how much sunlight and shade you can expect.
Building Permits/Zoning Laws
There are various codes, zoning laws and building permit rules that you will probably need to follow for your backyard office build. We say probably because some towns and states have exemptions depending on the cost of the building (such as not requiring a land or build permit if the cost of materials is less than $2,500).
Some of what you need to do (or file for) can get complicated. If you are an “Owner-Builder” (i.e. you are doing the work yourself) then you might be exempt. Also a simple building which could be viewed as a “playhouse” often does not need building permits, apart from in some areas which will require permits if they contain utilities (such as electricity). Ugh. It is all a little confusing, and that does not even get into things like setback codes (which determine how close to a neighbouring property boundary you can build).
Our advice is to either:
- Speak to friends and neighbors who have built a similar building, and see what permits, zoning laws and codes they needed to follow/request. You might find that some people stuck to the “it is better to ask for forgiveness than permission” mantra and just did the building without following the proper channels. We leave this up to you, but you would not want to find yourself in a position where the local enforcement officer says that you need to tear down your office which took you ages to build.
- Contact your local enforcement office. Tell them what you are planning to do, the approximate cost and size of the building and any utilities (such as electric) which you will be running. See what they say. This is the safest option, and hopefully they do not require expensive permits and building plans for a simple office shed!
2. Foundations And (Sub) Flooring
This is where the fun starts! Well, if you opt for a concrete foundation then it can be hard work at times… but it is still fun! Okay, so you have two main options for the foundation/base:
- Concrete slab foundation. This is where you pour a bunch of concrete to make a level slab of concrete along the floor. This should be a sufficiently deep pour to prevent any minor movements in the ground. The wood wall framing then attaches to this concrete slab via concrete screws. This option is best (if not necessary) for larger buildings, but is probably overkill for a single room garden shed building.
- Wooden subfloor. This easier option involves putting pressure treated (hence water resistant) wooden floor joists onto the ground (or raised slightly – as we will cover below – to prevent possible wood rot). This option is fine for smaller buildings, and the wall framing naturally attaches to this via wood screws.
Concrete Slab Foundation
So the aim here is to end up with a level slab of concrete across your floor. You can either ‘build upwards’ and actually pour concrete above ground level (with the use of wood forms/shuttering props), or dig a trench and pour concrete below ground level. You will want the concrete to be sufficiently deep to prevent minor movement in the earth. For a smaller building, just 6” (15.2cm) should be fine. Although for larger buildings, you might need to dig down 3 foot (91.4cm). If in doubt, check with a local builder or possibly even your local building planning officer.
We look at both options in more detail below, but in either case you will need to ensure that you run any necessary cables/pipework. Usually, a ground electrical wire will be needed (so that your electrics for the build can be properly grounded) – but naturally other electric cabling will be needed unless you are powering everything via a heavy duty extension cable.
Also you will see from the images below that steel reinforcing bar (rebar) is used here, firstly in the form of a steel mesh grid and then actual rebar which is laid out as needed. Its purpose is to help increase the overall strength and durability of the concrete foundation. This is because ground movement can cause tensile stress, which concrete is bad at dealing with. However pouring concrete into a rebar grid will reinforce it, allowing the concrete to deal with the tensile stress better. This might not be needed for a simple, single-room backyard office – but the type of soil and area you live in will also determine whether you need it or not.
Concrete Above Ground Level (Forms/Shuttering)
This route saves you the hassle of having to dig down into the ground, and potentially worrying about roots or underground utilities (although utilities should not be too close to the surface). You will need to build a border of wood (called wood forms or shuttering) which is purely temporary: it holds the concrete in place whilst it sets, but should then be removed afterwards:
In these pictures, the goal was a two-tier concrete level: one for the main office shed, the other for a small patio area. This is why the wood form in the center is at a higher level than the outside wood forming. Bolts are seen sticking out of the ground in the third picture, which match up with the pre-built Tuff Shed kit. If you are building your own wall framing, you will not need these bolts and instead can attach the walling to the slab via concrete screws.
A note on gravel under the concrete slab. Instead of pouring directly onto the topsoil layer, this will have been scrapped away and you can see that there is a layer of gravel instead. This can have a few benefits, the main one being that soil can suck the water out of the concrete whilst it drives, leading to a weaker slab (and hence weaker foundation). The layer of gravel helps prevent this.
Concrete Below Ground Level (Trenches)
For bigger backyard offices (such as studios with more than one room, or even two-story office builds), you will need to treat this more like building a house and dig trenches which will usually be 3 foot deep (but double check this with local builders/planning officials). The trenches will line up with where your structural walls will be (as in, if you will have a main load-bearing wall in the middle of the building, you will need a trench dug for this too). However unless your office shed is particularly complex, you might find that only your exterior walls are structural: hence you will only need a simple, rectangular trench around the outside of where the building will go.
You will then need to dig down 6” or so in the rest of the areas since this will also be filled with concrete to make one big, level flooring slab. In other words, your foundations will have different levels: the main trenches which will have 3 foot deep concrete, then the rest of the pour will be 6” deep:

Some work in progress pictures of below ground trenches being dug are below:
Depending on various factors, screw-pile foundations might be a cheaper foundation option for your DIY backyard office. Check out the details in our overview here.
Wooden Subfloor
Instead of going down the route of a concrete foundation (which is nearly always more work and more expensive!), if you are working on a simpler, smaller office shed then a wooden subfloor should suffice. The goal here is to create a network of wood which is similar to an outdoor deck: i.e. with an outside ‘border’ of wood, then lots of inside wood connected to the outside wood with metal brackets (joist hangers) or galvanised nails/screws. The corners (of the outside wood) should then be connected with metal corner brackets.
Some people use 2’x6’ timber throughout, others use 2’x10’ or 2’x12’ for the outside timber and 2’x6’ or 2’x8’ for the inside timber. It will end up looking something like this:


The inside timber is usually around 16” apart, although Engineering Toolbox have a handy table which can guide you more exactly based on what you are building.
The timber you use must be pressure treated (waterproof) wood, otherwise it will very quickly rot. However beyond this, you should not simply put the wood directly onto your top soil. This is because it will subject the wood to constant moisture, which over the years can cause rot even in pressure treated wood. There are two main options here:
- Compacted crushed gravel. You can scrape away the topsoil and replace it with crushed gravel (a sand like substance) which is then compacted down to give a ‘moisture barrier’ type layer. This will prevent the soil’s moisture from rising up into the wood:

- Concrete (cinder) blocks or piles. This is where you dig ‘mini foundation’ trenches, which you then either pour concrete and put concrete (cinder) blocks on top of, or put concrete piles into the mini-trench and backfill with concrete. You will need a minimum of four blocks/piles (one in each corner) to put the outside timber on top of, although it might be worth adding more blocks/piles along the long width of the wood run (assuming your backyard office is rectangular shaped):


Subfloor Insulation
Whether you go down the concrete or wood subfloor route, you will probably need ‘subfloor’ insulation otherwise the cold from the ground will make your lovely new backyard office cold as well!
With a wood subfloor, this is fairly straightforward and it is just a case of filling the gaps between your inside wood joists with cut-up insulation board (such as PIR insulation board or EPS rigid foam insulation):

With a concrete foundation, you can either put the insulation board under the concrete – i.e. before the concrete is poured:

Or you can build a ‘fake floor’ above the concrete, which would be 2-4” EPS insulation board and then plywood/OSB board on top. This is well described by JLC.
3. Framing The Walls
Even if you dislike working with wood, framing the walls is usually a fun step because you see your backyard office really start to take shape – hopefully fairly quickly, too! The basic idea is that you will use 2’x4’ wood which is 8 foot (2.4m) in length, and build an initial square (well, rectangle) with it – using a nail gun as required to join it all together. At this point, your ‘wood square’ would be fairly weak: so we need to add vertical wooden studs (also 2’x4’) every 16” (40.6cm) for support:

Another way of describing this is that you start out with a piece of 2’x4’ wood laid flat on the ground, and attach this to the subfloor with the appropriate fixing (long wood screws for a timber subfloor, or concrete screws for a concrete foundation). This is known as the footer wall plate. From here you then add the corner pieces of wood, and then the pieces of wood at the top which is known as the header (ridge) wall plate, before adding the vertical wall plates for support. This is the same thing as what we mentioned earlier, but we find that it can be hard to visualize things when talking about ‘footer plates’ and ‘header plates’. ‘Wood square’ makes more sense at first! But the reason we are introducing these terms is because for added support and stability, it can sometimes be necessary to add another header plate: known as a doubled header ridgeplate.
This doubling up (which just means adding an extra strip of 2’x4’ all along, above your initial ‘wood square’!) is most common on load bearing walls – and you probably need them at this stage, since you are building your main external walls! The idea is that this doubled up top ridge plate overlaps each wall, better joining each wall together and thus providing extra strength to the overall wall structure (especially since it means that the load from the roof joists is more evenly distributed along the whole structure):

4. Windows And Doors
As you can see from the above, the mix of vertical and horizontal studs leads to a strong, load-bearing wall. So imagine cutting a bunch of holes right in the middle of the wall, cutting off the studs – that does not sound as strong, right? Well that is what we obviously need to do for the windows and doors, so how do we ensure that the wall structure continues to be strong and safely load-bearing?
The general idea is that a cross beam (horizontal stud) is installed above and below windows, and just above a door (since obviously the door will go down to the floor). The door’s weight is naturally supported by the floor, however the window is not the same and the cross beam below it is not enough to support its weight. So some extra vertical support studs (known as bottom cripples or simply supports) then go below the window, to provide extra load-carrying support. Finally, similar supports go above the door/window header (cross beam) and connect to the main top vertical stud:

Whilst this might seem a little complicated at first, it makes sense when you step back and think about it. The whole idea is to restore the structural integrity which the large holes have created. So the main gist is that cripples are used above doors and windows, and below windows, to add extra support. Headers (horizontal cross studs) are also used above doors and windows, connecting to the other studs, both for extra support and to give the cripples something to connect to. Phew, did that make sense? Do not worry if it still does not fully, perhaps an actual picture of the finished thing will make more sense!


Finally it is worth mentioning the ‘trimmer’ that you will see on the diagram earlier. This is also known as a jack stud and it goes on both sides of the door/window: its purpose is to hold up the header above the door/window. Without this, the header would only be supported by the horizontal studs and nails, which would not lead to a completely supported door/window. These trimmers go all the way from the header down to the floor, meaning that the header is essentially supported by the floor.
5. Wall Sheathing
Great, so at this point we have an initial structure which really allows us to visualize what the final office will look like! The next step is to begin making the building weatherproof, along with adding some extra stability to the wood framing.
Wall sheathing involves nailing sheets of wood (usually plywood or OSB) to the outside of the building, so that the entire wooden frame is covered with the exterior plywood or OSB. This helps give even more rigidity to the structure, and it also gives a solid, level surface for the external siding/cladding to attach to.
Some OSB for this purpose have pre-printed blank lines on them so that you know when to nail the OSB into the wall studs, which is pretty handy! You will need to use at least 2.5” (6.4cm) galvanised nails for the wall sheathing, and it sound end up looking something like:

6. Roofing: We Are Watertight!
Hopefully you have been enjoying demonstrating your carpentry skills, because you have more to do now! The roof is naturally one of the most important parts of your office shed, because it is the final step in making your building watertight. There are various types of roof, such as:
A flat roof where the roof is either completely flat and covered with a waterproof material like fibreglass, or is almost flat but has a small 1-2o incline to allow (heavy) rain to fall off the roof. A gable roof which is standard for most houses – whereby you have a tall peak in the middle, then two slopes on either side. These are one of the harder types of roof to build, but also one of the best. They are not required for a small backyard office, though. A shed roof which is similar to a flat roof, but it has a greater incline: you can see clearly that it is not a flat roof, due to its bigger slope. A hipped roof, gambrel roof, mixed roof and various other styles which are useful for some types of houses, but not useful for a backyard office.
This section will cover the shed roof style which is best in most cases for our purpose, although if you have extreme weather then a different type of roof might be better. The general approach for a shed roof (which we cover in more detail below) is:
- Create the ‘wedge’ shape on either end of the walls, so that we have the angled roofline.
- The timber joists (called rafters) which make up the ‘wedge’ shape have a notch cut out of them known as a birdsmouth joint which allows them to sit flush with the top ridge of the walls.
- More timber joists are added at regular intervals.
- Like your walls, we add more sheathing on top of the rafters. This could again by either plywood or OSB, although (again) OSB is probably the more popular choice at this stage.
- Cover up the roof with a waterproof material: this could be a metal roof, plastic, shingles or rubber EPDM.
Okay, so the angled wedge is added above the existing top ridge of our walls:

In essence, the two corner studs from the walls continue upwards so that they are taller than the other two corner studs. Then you have the slanted roof joists (usually at 16” intervals) which have a birdsmouth joint notched into them, allowing them to sit squarely on the original wall top ridge:

And finally, this wedge is supported with regular vertical wood studs. In the end, you should have something that looks like:


Now that we have the end structures on either side which give a solid, supported angle for the roof, next you will want to add more joists at regular intervals along the roof. These should overhang the wall on both ends, which give a fascia and soffit type effect to the roof:

It is also worth noting that you will need to use metal brackets to secure the joists to the top wall ridge. This is done with hurricane ties/brackets, even if you do not live in a hurricane-risk area! Something like Simpson Strong-Tie 18-gauge hurricane ties will do the job very well:

At this point, we have the sloped structure which can allow us to finish the roof. So the next step is to add sheathing, in the same way as we did with the walls (albeit whilst standing on a roof, so safety needs to be considered even more). You can again use plywood or OSB, and this will be nailed in at regular intervals to the joists to end up with the following:


The final step is making your roof waterproof via one of many different material options, which we mentioned earlier (metal, plastic, shingles/tiles or rubber EPDM). This is quite a varied topic, especially for slightly more specialized methods like rubber EPDM so we will not cover each in this guide. We will briefly mention metal which lasts a very long time and is getting cheaper all the time as a roofing material.
You will buy sheets of galvanised metal which is usually either thin 24” strips or 3 foot wide sheets, but this can vary. These often have a lip/seam on one end, to allow for it to overlap the other sheets (and thus increasing water tightness). You will need to screw through the metal sheeting, through the OSB and into the joists/rafters underneath. This will end up with a secure, watertight roof:


You now have a building which can withstand light rain: congratulations! The walls naturally need a little bit more work, hence the next section which looks at siding.
7. Siding And Insulation
Now that your basic structure is complete and your backyard office is broadly waterproof, you can add the nice looking external cladding (known as siding). This will lead to a fully waterproof building, allowing you to switch to the internals: starting with fitting insulation. Please note that depending on how you run your electrics, you might need to do some of these runs before the insulation. We will nonetheless leave the electrics in a separate section (the chapter directly below this one), but just be aware of this.
Okay, so to make your building look good from the outside, you have various material options for siding: actual wood, engineered wood, vinyl, aluminium (or a couple of other metal siding) etc. This is very much personal preference, although since you have the sheathing boards you should be able to just screw/nail/fix to this in a fairly easy (if not repetitive!) manner. One word of caution is that you will need to make cuts around doors and windows (and naturally where the walls finish): so a touch vinyl/metal siding solution might be more difficult than a wood based siding.
With that said if you still are not sure of the siding type you would like, we would suggest that you check out a site like Pinterest to get some inspiration for different siding options. For the purpose of this section, we will briefly look at how Mr Money Mustache cladded his ‘tiny house’ (office shed) with red-stained cedar fence wood.
For added insulation, 1” foil-covered foam insulation board was added onto the sheathing (which is an optional step depending on how warm or cold your area tends to be). Then the cedar fence wood was fixed over this to create a nice effect:

Read more about the proper insulation for your DYI building.
Once the siding is complete, you can finally focus entirely on the inside of your now-waterproof building: congratulations! So the next step is internal insulation for your walls and ceiling, of which there are three main options:
- Batts (fibreglass) insulation. This is the ‘fluffy’ roll of insulation which is very itchy! This is usually the cheapest option, and it involves running this in-between your 16”-spaced timbers. This is a very flexible and lightweight material, so you do not need to cut it for utility (e.g. electrical wiring) runs.
- Foam insulation board. This is the large foam board which contains various insulating materials, and it offers up a fairly good level of insulation – but at double the price of batts/fibreglass insulation usually. You will again need to run this inbetween your wall/ceiling timber, cutting gaps as needed depending on any cross beams, windows/doors and utilities you have coming through.
- Spray foam insulation. This is a more specialist option, and due to the cost of equipment you will probably need to hire a third party company in, but it involves specially made ‘insulation in a can’ being sprayed into your wall and ceiling spaces. This then expands in size, filling the relevant gaps and providing a high level of insulation. It might need cutting back once it is done expanding though (to be flush with the wall and ceiling again), so it is a more labor intensive process overall than the first two options.
Double check the R-rating and price of whichever option(s) you are considering, and then go ahead and install it (or hire in a spray foam specialist):

You should now have a warm backyard office which is ready for the final stages: electrics, drywall and decorating!
8. Electrics: First Fix
Electrics is a hard thing to cover in a guide like this, because every country has their own wiring standards and techniques. One thing that is fairly common, though, is that you have two main options for the electrics:
- You can wire up the electrics for your backyard office just like a normal house, with proper grounding and a full-voltage supply cable, with smaller electrical cable runs for your power and lighting circuits.
- Terminate all your internal electrics with a male outdoor receptacle, just like tiny houses on wheels and RVs do. Then you can run a heavy duty extension cable from your house (possibly underground via a small channel you make, so the cable is hidden away) and power your backyard office off this.
The second option is purely down to how much electricity you plan on using. A lot of modern laptops and computers can use as little as 100-150 watts (but could be 500+ watts if you are using power hungry hardware like graphics cards), small fridges can be 250 watts and most lights will use barely any electric. So if are not expecting to use much power, the RV style of doing things could be possible.
If you go for the first option, though, we would recommend hiring in a competent, qualified electric contractor unless you know exactly what you are doing. If you want to try it yourself, we found the Youtube video by Land to House really helpful:
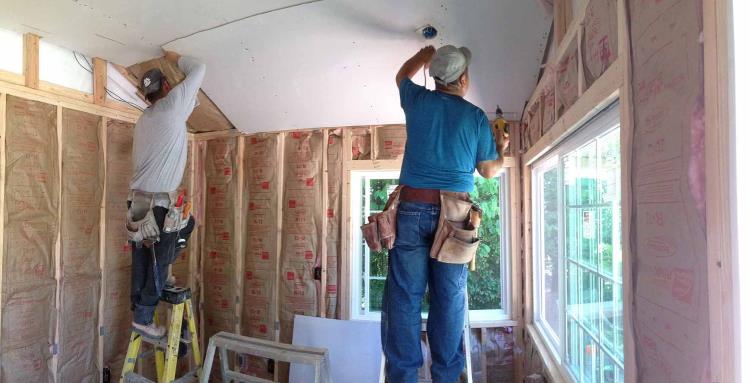
9. Drywall And Second Fix Electrics
You should now have a dry, insulated backyard office with electrical cabling and metal back bracket attached to studs where you want your power outlets to go. So you can now start hiding all the construction detail away, via the drywall stage. This involves buying 4 x 8 foot sheets of drywall, and attaching it to the walls and ceiling via lots of nails!
Unless you have doing lots of drywalling before, you might need a friend to help you because it can be fiddly at first, plus the sheets can be heavier that you were expecting (which is especially noticeable when trying to work the drywall into a particular position).
Do not worry about very small gaps in-between drywalling: this is completely normal and you will fill these in with spackle (sometimes called polyfilla) or hydrocal (a plaster material), and sand it down after it dries leaving a level, continuous look and feel to the wall.
You will need to cut a hole in the drywall for any power outlets (i.e. anywhere there is a metal back bracket). The ‘second fix’ electrics will then simply involve stripping the cable, wiring up the power outlet and screwing the front plate (of the power outlet) onto the metal back bracket – giving a flush finish with the drywall. Using a drywall keyhole saw (whether a manual hand one or an electrical saw) is key for this.
[amalinkspro type=”showcase” asin=”B07DKRCNX3″ apilink=”https://www.amazon.com/dp/B07DKRCNX3?tag=sth078-20&linkCode=osi&th=1&psc=1″ new-window=”true” addtocart=”false” nofollow=”true” sc-id=”4″ img-sizes=”500:500″ imgs=”https://m.media-amazon.com/images/I/31rPyQdurOL._SL500_.jpg” link-imgs=”false” specs=”Folding saw with durable carbon steel blade is as sturdy as fixed blade jab saws~~~Hand saw has faster cutting blade with triple ground teeth and ability to cut in both directions~~~Lockback mechanism secures the blade open at 125-degree and fully open at 180-degree~~~Folded saw keeps the blade from piercing through tool pouches and bags~~~Cushioned handle-end for easier palming of the saw” btn-color=”#ff9900″ btn-text=”Check Price on Amazon!” alignment=”alignnone” hide-prime=”0″ hide-image=”0″ hide-price=”1″ hide-button=”0″ width=”750″]Klein Tools 31737 Folding Jab Saw / Drywall Saw, Hand Saw with Lockback at 180 and 125 Degrees and Tether Hole[/amalinkspro]
The same is true for the ceiling – whether you are having spotlights or a couple of standard ceiling lights, you will need to cut the relevant hole in the drywall to allow space for the electric cable to come through it (and a wider space for spotlights). Then the ‘second fix’ will again involve stripping the cable and wiring this up to the light, and securing this to the ceiling as appropriate.
10. Decoration And Finishing Touches
You are almost done! At this point you have a blank canvas: white (or light gray) drywall and filler everywhere, but with working power outlets and lighting. Hopefully at this stage you have thought about how you want to finish off your home: how to decorate the walls and what floor finish to put down.
This is obviously a really wide area and we will not bother covering how to hold a paint brush or put wood laminate on a floor! But we will list some different ways that you can firstly finish your walls:
- Painting – the obvious, but go out and buy a bunch of paint in whatever color you prefer. White ceilings is standard, but most people then go with a different color for the walls.
- Wallpaper – this is not as popular in America, but it involves sticking (‘hanging’) pre-printed stripts up paper with decorated patterns on them onto your drywall.
- Wood cladding/panelling – there are various hardwoods and softwoods that look really nice, and these can be stuck onto your walls (in overlapped fashion) with screws or nails to provide a cabin feeling.
- Tiles – whilst not as common outside of a kitchen or bathroom, you can get some really decorative tiles which look lovely on the walls of living areas/offices.
In terms of flooring options:
- Keep the plywood/OSB – if you like the look of your current base flooring, there is no reason why you could not just sand it down and then seal it with something like polyurethane.
- Real or engineered wood – you can buy actual wood planks (or partially real, partially engineered) wood for your flooring which have tongue and groove joints to easily fit together like laminate.
- Wood laminate – the easy and cheap option, which nowadays can look really nice: using manufactured laminate boarding which looks like wood, and has tongue and groove joints which snap together and leads to a strong and fairly water resistant finish to your floors.
- Vinyl – there are a few vinyl options, however vinyl in general can provide a nice looking, fully water resistant finish to your floors and it is fairly easy to lay down.
- Tiles – a more popular option for kitchens and bathrooms, but tiles which are stuck down with a concrete-based adhesive and then finished with mud (also called grout) inbetween each tile provides a nice looking floor which is also fully waterproof.
- Carpet – possibly the most common option, carpet is warm, looks good, feels good underfoot and will be pretty inexpensive to buy and install (even if you choose an expensive carpet per foot/meter, since your overall floorspace will not be huge).
As you can tell, how you finish your backyard office is the same as a normal house really. The more you use house-style of finishes, the more your office will feel like a home instead of a shed in the middle of your backyard! So we would recommend spending some time and providing a good quality of finish.
Some pictures of the finished internals of other backyard offices are:


11. Thanks To
We found the following guides very useful and would suggest you check them out to learn more about the DIY building process:
- Tuffshed’s backyard office kit
- MrMoneyMustache’s detached studio
- MrMoneyMustache’s backyard office
- LessEverything’s backyard office
- Roger Perkin’s office shed
- Plasticine House’s roofing guide
Summary
If you have got this far, congratulations! You now have a swanky backyard office… or at least, you have an idea how to build one (which is half the battle, too: knowledge is power!). As you can see from our guide, many (if not all) of these steps can be done by yourself – especially if you have done progressively trickier DIY projects over the years, too. If you have never picked up a screwdriver or hammer, however, then you might need to get a friend or general contractor to help you – plus specialist trades in for the electrics and possibly the roofing. But nonetheless, it is possible to DIY much of this build and save money compared to getting a contractor to build the entire thing for you.