Blog
Tiny House Water And Sewerage Guide: All You Need To Know
Building a fully sized house on fixed foundations will usually mean digging trenches and running various pipes for water and drainage, but what about tiny houses? Many are built on a trailer and are designed to be portable, so digging trenches and running loads of expensive pipes everywhere you go is not practical. Having said that, obviously this does not mean that your tiny house will never have water pipes nor drainage, so what are the options available to you?
If your tiny house is on foundations, you can hook up to the city’s water and sewer lines. In all other cases, using an RV-style hose to fill up your water tanks (or faucets on-demand) is one of the main approaches. There are various approaches for drainage, although black water drainage needs to be handled carefully.
Since there are various options for bringing water into your property, along with how to properly drain the waste water, we have written this guide to explore the various approaches.
When you buy through links on our site, we may earn an affiliate commission. As an Amazon Associate I earn from qualifying purchases.
Definition Time! On-Grid, Off-Grid, Fresh Water, Rainwater, Black Water And Gray Water
Before we discuss the water and drainage options for your tiny house, it is worth giving some definitions to the terms we will frequently use.
- On-grid: this is where the tiny house is parked (or fixed to a foundation) where a permanent water supply is available to tap in to, whether this is the city’s standard water grid or a campsite which offers water (e.g. via a hose).
- Off-grid: off-grid refers to getting away from main cities and towns (which have infrastructure grids for water and electricity), and living in a more remote location. This area will not have a standard water source to tap in to.
- Fresh water: this is clean, purified water which can be used for drinking. On-grid water sources will fall into this classification, barring local city water supply issues.
- Rainwater: this is kind of an obvious one, but it refers to collecting rainwater and storing it in a tank for future use. Rainwater is nearly always safe for showering and washing hands, and it can potentially be filtered to make it safe as drink water. Rainwater catchment is disallowed in some parts of America and some other countries, however.
- Black water (or soiled water): water which has been soiled, usually meaning toilet waste water, is considered blackwater (also known as soiled water’). Some states in America also consider kitchen sink water (which naturally can contain food waste from washing dishes) to be black water.
- Gray water (or waste water): unsoiled water, such as tap and shower waste, along with washing machine waste, is usually considered gray water (or ‘waste water’). This is cleaner and safer than blackwater, and so it is easier to dispose of.
Main Water Methods
We have already alluded to the main decision point which will affect your water source choice, and it is whether you plan to stay on-grid near a fixed water supply, or if you plan to move around and/or potentially stay off-grid. If you have a tiny house on a fixed foundation, or it is on wheels but you are not planning on moving anytime soon, then hooking it up to the grid offers various benefits over more temporary and laborious methods of sourcing your water.
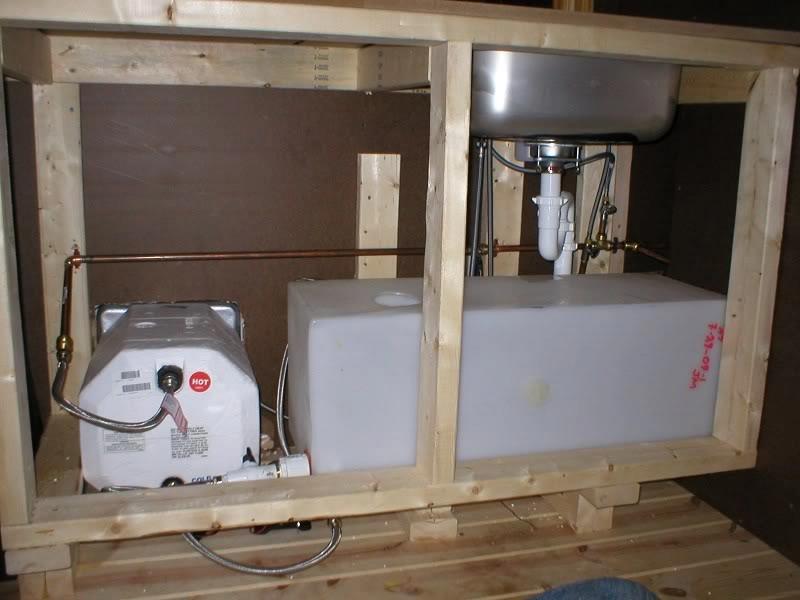
Secondly, you can either store the water in tanks (and pump it around your tiny house) or use the water ‘on demand’ via the hookup you have (either to a hose or the grid). We explore this more below, but the second option is easier but it naturally requires you to be on-grid. Having tanks and a pump system is more common for tiny house on wheel dwellers, since water sources might not always be guaranteed. The tanks are usually stored under some of the kitchen cabinets, where the water is then pumped to the faucets and shower whenever required:
Thirdly, some people choose a different water source for their drinking water versus their washing water. In this situation, you could always buy purified water for drinking, and then you have more options for washing water because it does not need to be 100% purified.
With all that said, let’s take a look at the main options for getting water into your tiny house:
- RV hose via outside tap/spigot. This is probably the most common option, and it is the same approach that RVs take when they are parked in an RV site or campsite. You will end up with a water inlet fill valve or an outdoor tap/spigot, and this can be connected up to a hose on the outside. On the inside, your whole plumbing system will run off this just like any other copper or PEX plastic pipe system.
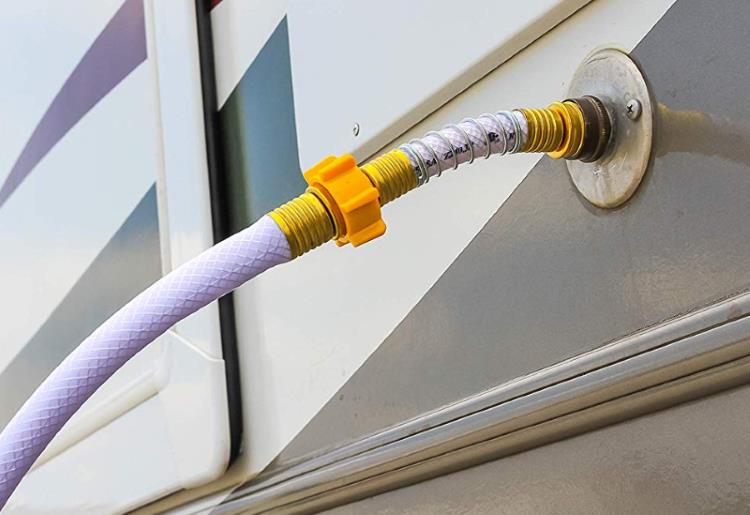 You might have been taught as a child to never drink from a hose. This is generally true due to the protective chemicals/materials that garden hoses tend to use, but you can buy an “RV white hose” (also called a “portable water hose”) which is safe to drink from. This hose can either feed your faucets ‘on demand’ (which is mainly worth doing if you are pretty confident this supply point is permanent – such as in an RV park), or you can hook it up to storage tanks as mentioned earlier. The benefit of the tank approach is that you can always fill them up whenever you have access to water, but then go off-road for a few days/weeks without having to worry about a water source.
 - The grid. This is the straight-forward option: the city that you live will have a public water supply which you can hook up to. This will either involve getting the utility company to run a new pipe line and outlet for you to tap into, or feeding off the nearby house’s water supply (assuming it is your land or you have permission to do so!). If you live in a cold area, you may need to consider whether your supply pipes could freeze in winter, thereby cutting off your water supply. If this is the case, digging down over 2 foot (60 cm) before running your pipes should mean that the soil naturally insulates the pipes and prevents them from freezing. You can also use trace heating tape to prevent the pipes freezing.
- Fill up water containers, which feed the tanks. When you are off-grid, one of the most common solutions is to go to a clean water source (which might be a friend or neighbor’s outdoor tap) and fill up a range of portable water containers. Make sure you take a lot with you, and haul them back onto your vehicle once done. Then when you are back at your tiny house, you can pour them into your house’s water inlet point (which is similar to the hose point mentioned above, but it will be wider since you might need to insert a funnel before pouring the water in). These will feed into your water tanks, for use on-demand (via your pumps) as we mentioned earlier. There is a handy video guide on this point in the final section.
- Fill up water containers, have no plumbing. If you do not want to sacrifice valuable kitchen space with a tank and pumps, the other option is to have no plumbing at all. This is more of a lifestyle choice (because it will require some sacrifices), but if you like ‘old school’ living then it could be for you! Have you ever had a bath which does not also have a shower to rinse off any suds at the end? If so, you might have used a jug which you pour water into and then over your hair/body to get rid of the bubbles. A tiny house without plumbing would be similar to this! Basically you would have various jugs of water (filled up from your water containers) where you would usually have faucets, such as by the kitchen and bathroom sinks. In terms of showering/bathing, you could either go super old-school and have a cold bath (perhaps with some kettle-boiled water to heat things up?!). Or you could pour some water into an overhead heated water tank, and have a gravity-fed bath/shower. This ‘no plumbing’ option does not mean having no water or zero pipes, but it does mean signing up to a less modern lifestyle. If you are willing to do this, however, two big benefits are that your tiny house build will cost thousands less, and you will not have to worry about pipes freezing or leaking.
- Collect rainwater. Some people collect rainwater that falls onto their tiny house by redirecting their guttering into a water container (or by installing a purpose built rainwater catchment system outside, since a tiny house’s floor space is not big enough to collect loads of rainwater). This can be a good way of getting water for washing and bathing, although rainwater catchment is illegal in some American states. We explore this option in more detail in the “Environmentally Friendly Considerations” section.
- Pay for a water delivery. Some companies offer water delivery to your house. Many of these offers is for drinking water (sometimes in small bottles, which obviously is not cost effective if you want water in bulk), but some services do offer bulky, multi-gallon water delivery options. There depends on where you live, of course, and if you truly off-grid then companies might not deliver to you. However getting home water delivered could save you time compared to taking a dozen water containers to a friend or neighbor’s house (as we explore earlier).
- Spring/well collection. If you are lucky enough to live near a natural water feature, then you might be in luck. Even small springs and streams could give enough water for you to fill up buckets (which you then add to your water tank or water jugs) in half an hour or less. Building or living near a well is another option, albeit building a professional well would cost thousands. The main things to check with this approach is whether you are allowed to tap into the spring/well (some local zoning areas might have issues with doing this) and also if the water is clean or not. If there is a source of pollution upstream (whether it is from historical waste/factory sources, or illegal dumping), you would not want to use this water for anything – even washing your hands.
- Chrome plated die cast steel flange
- Plastic check valve and check valve body
- Style: 1/2 MPT
- Cutout Dimensions: 1-1/2 diameter; Outside Dimensions: 3 diameter
- Valve Depth: 1-11/16
Wastewater/Sewerage Drainage Options
As you might have guessed from reading the introduction and water source section, how you deal with wastewater/sewerage also depends on whether you are on-grid or off-grid:
- On the grid. This will involve running various waste pipes around your house and then out of it (usually underneath it, if you have a tiny house on wheels). The waste pipes will ultimately converge at a point, and this point can then connect to a sewer or septic tank system. A sewer point is the most common option (and is shown in a video at the end of this guide), however some more remote areas will instead offer access to a septic tank system. To be honest, though, when on-grid both options will be managed by someone else: all you will need to care about is hooking up to the sewer/septic pipework.
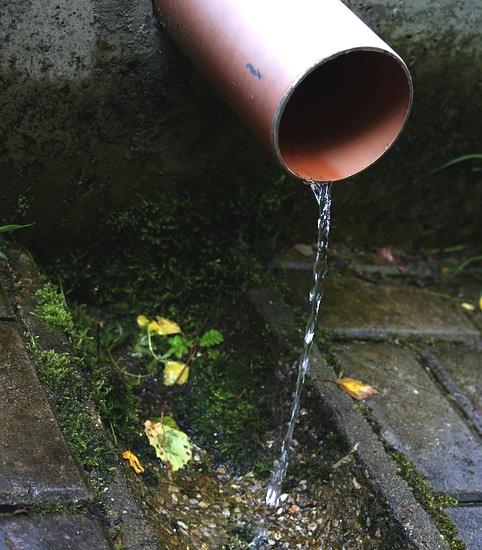
- Greywater back to ground. Most areas consider the waste water from your sinks, washing machine and bath/shower as greywater, and are relaxed about allowing this relatively clean water to be dumped into the ground. Perhaps ‘dumped’ is too strong of a word: since greywater is relatively clean (it has not been ‘mixed’ with human waste, for example), it is a natural process for this water to be returned back to the earth. This might involve directing it towards grass or flowers, or simply allowing it to drain away through natural soil. If you notice that it does not drain away as quickly as you would like, however, then consider installing a french drain (which is essentially a case of digging a hole/trench and filling it with rocks/pebbles: which allows the water to soak away more naturally). Not every area allows for greywater to be dumped back to the ground, however.
- Dump station. For blackwater and/or graywater, you can also collect this in big containers (one for each: the two waste waters cannot be mixed!), and then take them to a waste dumping station when they are full. Also known as an ‘RV Dump Station’ or ‘Waste Receiving Station’, some are free for non-commercial users whilst some will charge you either way. If you are planning on living in an area where greywater dumping is disallowed, double check how close your nearest dump station is. Hopefully it is not too far away (since it will be your only real option if you are off-grid), but even if you have to make a trip one morning every fortnight it might not be too bad. The two obvious downsides of this approach is that the containers will take up much-needed space in your tiny house (unless you look to store them outside, but this will limit your portability), plus having blackwater inside your house for days is not a nice thought: especially if the container was to leak!
- Composting toilet. A composting toilet will mean that you have no blackwater waste per se, merely a form of compost which you will need to dispose of every few weeks. The main type of composting toilet is a waterless version which leads to a microorganism process working on any solids (i.e. poo) and breaking it down into a safe(r) compost-type material which can be disposed of. This process happens by also using liquid urine and a carbon additive (such as sawdust), which is added to the toilet after a number two. The toilet itself does not give off a smell because it maintains a permanent negative pressure, so the only real smell would be when disposing of the broken down solid waste once every few weeks. Composting toilets are the main option for tiny house dwellers to deal with their blackwater. You can read more about that here (including our overview of the best composting toilets).
Consider Having A Backup
We have discussed various options that will be available to you, but our advise if you are living off-grid is to always have a backup option. This is not too much of a concern for drainage/sewerage if you have a composting toilet and can dump greywater back into the ground, but a fresh water source for drinking and/or washing is really important.
Humans can go weeks without eating, they can only go for 5-7 days without drinking and whilst we are not suggesting that your health is at risk if your usual water source is out of action, it is worth having a backup option in mind – especially the more remote/off-grid you are.
For example, if you collect water in containers from a friend or neighbor’s property, be sure to be aware of other friends or neighbors that will allow you to do this as well if needed. You might alternatively want to be aware of nearby streams/springs which contain clean water, since this can be an invaluable source for filling up your containers and hence tiny house tanks.
Equally, if you are currently on-grid and hooked up to ‘on demand’ water, if you ever have plans to travel and/or go off-grid, having a tank and pump system installed as a backup could be a good idea. Then you have the best of both worlds: on demand water when on-grid, but a tank to tide you over when you are off-grid. This will lead to more complicated pipework (and more cost to install), but a mixed hybrid approach like this could be worth considering.
Environmentally Friendly Considerations
If you are redirecting greywater back to the ground, it is important that you use chemical free and eco friendly products wherever possible: for example, eco friendly soaps and as chemical free detergents as possible. This is because you will otherwise be dumping chemical-ridden products into the ground, which will have an adverse impact on the local ecosystem.
On the same note, avoid putting bleach and ammonia based products down your sinks. It is fine to use them on worktops and surfaces, but they will be harmful to the environment if dumped down your drains.
The same is true for cooking fat and oil: this should not be put down your sink even in a standard on-grid house, but it is even more important in a tiny house. Not only could it clog up your drainage pipes, but it will also be harmful if dumped into the ground (and potentially might not be allowed in a dumping station either). It is always better to bottle up as much cooking fat/oil as possible, and throw it away in the normal waste instead.
In terms of collecting water, rainwater catchment/collection can be a great idea because it is simply using something which quite literally flies through the sky (well, down from the sky – but still)! Obviously you should only do this in states and countries where you are allowed to do it, but capturing rainwater is an eco-friendly option because it is safe enough to wash with – and can potentially be filtered/purified so that it can be used for drinking as well. Rainwater can be collected by installing guttering around your tiny house, and redirecting the downpipes into a rainwater tub/container (picture thanks to Sun, Rain, Earth):
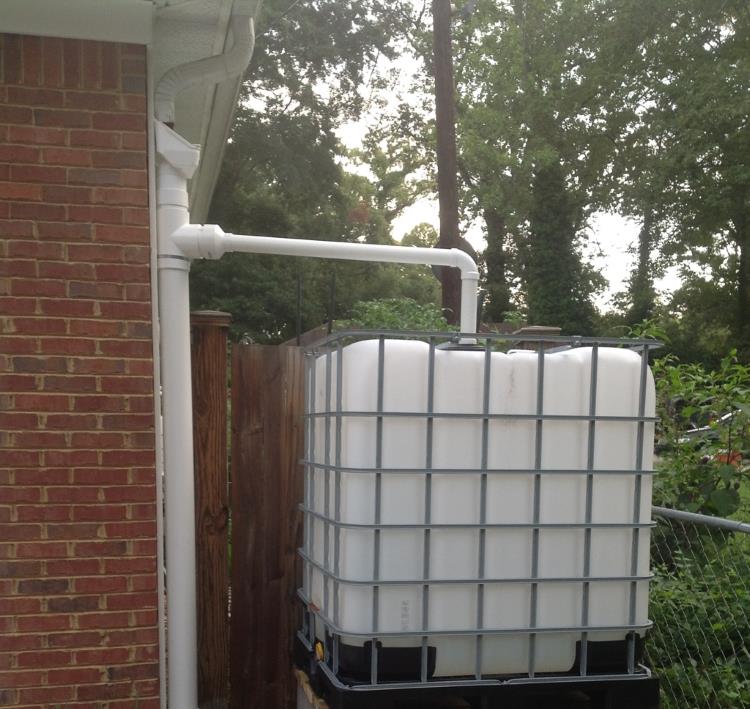
One thing you will probably find, however, is that the roof area of a tiny house is not massive: hence if you own (or are allowed to use) some of the land surrounding your house, you can always build a large roof area which slopes in one direction – and then have guttering on this one end to collect the resulting water.
From there, you can either use the rainwater in the tubs to fill up your tiny home’s water tanks, or potentially look at hooking up the rainwater tubs directly to your home’s water supply (as though it was on-grid). There is a video at the end which demonstrates this, although it is naturally (much) more work and cost than the manual approach.
Health Considerations
The benefit of a standard on-grid hook-up is that millions of dollars has been spent on infrastructure to ensure that the water you receive is safe, filtered and purified… apart from some tragic exceptions such as Flint, Michigan. When you live off-grid, your water source will not have undergone the same level of processing, so the following health and safety tips are worth remembering:
- If your water looks discolored and any cloudiness persists after a minute or two, avoid drinking it and possibly consider testing its safety before using it to wash with. Even mains water from the grid can get discolored and be a bit cloudy sometimes, so just be conscious of potential risks and apply some common sense.
- If you have been away and not used your water for a few weeks, it is recommended that you run your water before using it. This is because bacteria such as Legionella can start to grow in hot and cold water tanks, especially in stagnant water.
- Be very careful with storage of blackwater waste (if you do not use a composting toilet): it is considered a health hazard for a reason. Whilst the smell alone might stop you, never store it uncovered. Fecal waste contains a range of pathogens (bacteria/viruses which can cause disease), potentially toxic algae growth and other harmful germs. Also be sure to check your blackwater container regularly for signs of damage: you do not want any leakage from it (whether you store it inside or outside)! Some people in America live around open sewers and the effects are not nice, as Huffington Post report.
- No matter how clean you believe your water source is, some people prefer also installing a water filter which will help to improve water clarity and taste by removing some impurities. A product like the DuPont Whole House Water Filter is easy to install alongside your water tank system.
- If you have wondered how you can best check the purity of water, WikiHow have a useful guide on this. The gist is that water which is persistently cloudy, has particles floating in it or smells coming from it is probably not safe to drink.
- Filters Up To 15,000-Gallon For Home or Office
- Features Universal 500 Series Poly Block Cartridge
- Standard System has 3/4 in. inlets and outlets.
- Improves Clarity and Taste of Incoming Water, Also Protects At The Kitchen Tap
- 3-Year Limited Warran
Video Guides
We hope that you found the information above helpful. In addition to the above, we have also found some handy video guides.
Firstly, this 4-5 minute video shows both the hose (on-grid) and storage tank (off-grid) approaches to getting water into a tiny house:
Then there is the following 10 minute video which takes a detailed look at an effective rainwater catchment system for off-grid living:
A very detailed 30 minute video looks at off-grid living by making the occasional trip to a water source to fill up lots of jugs/water containers:
When it comes to on-grid living with sewerage access, the following two shorter videos shows the drainage runs below the tiny house and the second video also shows it connecting to a sewer:

